Wednesday, September 30, 2015

SERVLET LIFECYCLE


Introduction to Servlet:
Servlet follows a certain path from it's creation to it's destruction. This entire process is the Servlet's life cycle.

Here web container has a big role in maintaining the servlet's instance/ object. So before the main thing we need to know a little about the basics.


Here, Web container( Servlet container) is nothing but the component of a web server(such as Tomcat) that interacts with Java servlets.

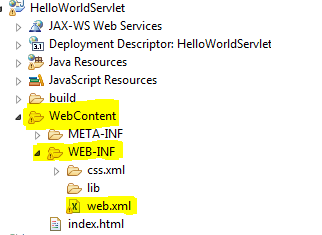
Basically when request is passed by a client in your browser it is delegated to the servlet container like Tomcat, Jboss etc. Then it will search the equivalent servlet class in the deployment descripter (web.xml file). This is simply an xml file that resides in app's WAR file under WEB-INF/ directory as shown in the fig. below.

                       fig1.  
         
Here in web.xml file, mapping between the URL paths and servlets is done. It is also needed for security and authentication requirement.        

Secure connection is an issue for both the request and response data. They are to be encrypted by the sender before they are transmitted and decrypted by the recipient. It is essential when it comes to protecting customer data, such as contact information, passwords, and confidential messages.

You can see in the fig. below how servlet mapping is done in web.xml file.                                
                                         fig.2
                                                                                                                                                                                                                                                                                                           
So, after the equivalent servlet class is mapped, that class is loaded into the web container. Here our servlet class is ActiveClient within the package called clientData which is mapped with the url-pattern called callservletusers. So, after which tomcat internally loads this servlet class.

<servlet-class>package name.class name</servlet-class

Servlet Lifecycle:

Lets jump into the lifecycle of Servlet to make it much clearer. The lifecycle consists of following steps:

1.       Load Servlet Class
2       Create Instance of Servlet
3.      Call the Servlets init() Method
4.      Call the Servlets service() Method
5.      Call the Servlets destroy() Method

Step 1, 2 and 3 are executed only once, when the servlet is initially loaded.
Step 4 is executed multiple times- once for every Http request to the servlet
and Step 5 is executed when the servlet container unloads the servlet

1. Loading:                                                                                         
Before a servlet can be invoked the servlet container must first load its class definition. This is done just like any other class is loaded.
                                                                                                                       
2.  Instantiation:                                                                                       
Then the web container internally creates an object of the servlet after loading it. It's instance is created only once in the server's lifecycle.
                                                                                           
3. Initialization:                                                                                                                                            
Our servlet class is formed when the class extends the HttpServlet class of Java. HttpServlet class internally extends GenericServlet which implements Servlet interface. This is a brief overview of the architechture of servlet class.    
                             
Following is the example of the GenericServlet implementing the Servlet interface which contains init() method within it.
                                                fig.3 

 So, after instantiation server here first calls the init()method present in GenericServlet which  our servlet class extends. The code is internally added by Java so we need not focus on it. This step is called initialization.
                 

4. Service:
                                                                                                                         
The web container then calls the service() method in the HttpServlet  which our  servlet class extends.The service() method is the main method to perform the actual task. It handles requests coming from the client and sends response back to the client.
                                                                                    
Here the service() method checks the Http request type (GET, POST,PUT, DELETE etc.) and  calls the doGet(), doPost(), doPut() or doDelete() etc, whichever method required. So, we don't have to concern ourselves with service() method but just have to override either doGet() or doPost() method in our servlet class depending on the type of request.        
                                                                        fig.4
In the above figure, ActiveInvestors is our servlet class that extends HttpServlet. The server directly calls service()method after initialization as in case of init() method. Therefore, while programming we need only to focus on the code we write in doGet() or doPost() method as above~

doGet() and doPost() methods are the most frequently used methods in each service requests.
Following is the signature style of these two methods~
                                                                   fig.5


Whenever the user sends the request to the server then it generates two objects, first HttpServletRequest 'req' and second HttpServletRequest 'resp'. 'req' represents the client's request and 'resp' represents the servlet's response.

In fig 4. 'resp' is an object of HttpServletResponse class, the second and third line calls method SetContentType() and getWriter() method. SetContentType() basically tells the browser what content type it is sending. In the above case it is text/html.

 However it is considered poor pratice as HTML code belongs in a JSP file but for learning purposes only I have shown it this way. To send character data into the browser we use the PrintWriter object ('out') returned by getWriter().


 5. Destroy:
The destroy() method is called only one at the end of the servlet's lifecycle. It is called before the servlet instance is removed by the service. It gives the servlet to close the database connections, clean up any resources sucha as memories, cookies, threads etc.
            

Saturday, September 26, 2015

Static variable and Static method:

In Java Variables can be declared with the “static” keyword.
Example: static int y = 0;
When a variable is declared with the keyword “static”, its called a “class variable”. A static variable always belongs to the class and not to the object . Since all instances share the same copy of the variable, a class variable can be accessed directly with the class, without the need to create an instance i.e an object. 
  • single copy to be shared by all instances of the class
  • A static variable can be accessed directly by the class name and doesn’t need any object

Using static variable of another classes

If you wish to call static variable of another class then you have to write class name while calling static variable as shown in example below.
                                                                                                                                                                     STATIC VARIABLE DEMO:
Here, convertMpgToKpl  variable is made static. Now the value of convertMpgToKpl would be constant for a class. Since the constructor is called twice as two object is created(x1 and x2), so the final value of the static variable is 2.
 Whereas the instance variable CarMilage and Carcolor is object dependent, for x object CarMilage value is 20 and for x2 object it's value is 50.

Same is true for static method, in order to access or call the static method one need not create an object.  Syntax:<class-name>.<method-name>

why you wouldn't want to create a static method?
Basically, polymorphism goes out of the window. You'll not be able to override the method, nor declare it in an interface. It takes a lot of flexibility out from your design. 

Friday, September 4, 2015

INTRODUCTION TO MAVEN

 Maven is a popular open source build automation tool and project management tool. It is designed to help us build the projects in a standard way with an easy way to publish project information and share JARs across several projects. It basically takes much of hard work out of build process.
Basically maven will help in -


  • Compiling your classes
  • Preparing a package out of these compiled classes
  • Running your tests
  • Deploying into the server

So all you have to do is follow certain conventions set by maven. Following is the standard Maven2 directory layout-

The src directory has a number of sub-directories, each of which have clearly defined  purpose:

  • src/main/java            : Your Java source code goes here.                                                 (for JAR files)                        
  • src/main/resources  :Other resources your application needs                                         like xml files and configurations                                                      goes here.(for WAR files)                                                                                     
  • src/main/filters         :Resource filters, in the form of properties                                       files, which may be used to define                                                 variables only known at runtime                                                                
  • src/main/webapp     :The Web application directory for a WAR                                      project                             
  • src/test/java             :Here the unit tests are carried out                                           
  • src/test/resources   :Resources to be used for unit tests, but will                                   not be deployed                                                                                      
  • src/site                      :Files used to generate the Maven project Website.


Once we follow this convention, Maven will automatically compile our classes, bundle those classes in jar files and run our unit test before deploying it in the server. So, it copies all its compiled classes and resources in the target directory which is shown in the layout above.

pom.xml file is Project Object Model(POM) which is the heart of Maven. It is an XML file that contains information about the project and configuration details used by Maven to build the project. 

This is how a pom.xml file should look like-


  1. <project xmlns="http://maven.apache.org/POM/4.0.0"
  2. xmlns:xsi="http://www.w3.org/2001/XMLSchema-instance"
  3. xsi:schemaLocation="http://maven.apache.org/POM/4.0.0
  4. http://maven.apache.org/xsd/maven-4.0.0.xsd">
  5. <modelVersion>4.0.0</modelVersion>
  6. <groupId>com.mycompany.app</groupId>
  7. <artifactId>my-app</artifactId>
  8. <packaging>jar</packaging>
  9. <version>1.0-SNAPSHOT</version>
  10. <name>Maven Quick Start Archetype</name>
  11. <url>http://maven.apache.org</url>
  12. <dependencies>
  13. <dependency>
  14. <groupId>junit</groupId>
  15. <artifactId>junit</artifactId>
  16. <version>3.8.1</version>
  17. <scope>test</scope>
  18. </dependency>
  19. </dependencies>
  20. </project>
It includes the informations like version of object model (<modelVersion>4.0.0</modelVersion>) this POM is using, your group Id and artifact Id for the unique identifier of the organization or group, packaging type to be used by this artifact(e.g. JAR, WAR, EAR etc.) and The url indicating where the project's site can be found.

You can declare your dependencies here. Suppose your project depends on another project, you can simply add those dependencies and frameworks in pom.xml and Maven will automatically pull those dependencies. 

To make it clearer, when you build a Maven's project, Maven will check your pom.xml File to identify which dependency to download. Here, Maven will get the dependency from your local repository, if not found, then get it form default Maven central repository http://repo1.maven.org/maven2/.

WHAT IS MAVEN LOCAL REPOSITORY?

Maven local repository is simply a local folder where all the project's dependencies (plugin jars and files) downloaded by Maven is stored. In windows by default it's location is in-
Windows – C:\Documents and Settings\{your-username}\.m2